Last week’s blog post dealt mostly with storage ideas using everyday household items. Like I said last week, I like to find new uses for items not originally designed for use in my sewing room. I’m one of those people that don’t like to throw something out if I can find another use for it. I bet you are too! This week, I am going to talk about everyday items that have become a favorite tool in my sewing room. Who knows? Maybe they will become yours too.
Item#1 – This is one of my favorite tools. Painter’s tape! Keep a roll of painter’s tape in your sewing room. This can be used to mark the line on your ruler when you are cutting multiple strips of the same size. It makes it easier to see find the measurement you are using over and over to save you time.


Painter’s tape is the perfect type to use because it does not leave any residue on your ruler and it’s fairly inexpensive for a roll. You can also use the tape to mark a quilting line on your quilt top if you don’t want to use a marking pencil on the quilt. This works well for wool appliqué projects you need to quilt as well.
You can use painter’s tape to mark the 1/4″ line on your sewing machine. Even if you have a 1/4″ quilting foot, the tape line gives you additional guidance for your 1/4″ seam. Here’s how I mark my 1/4″seam line on my machine:


I lower the needle into the “0” mark on the tape measure. That’s where I line up the left edge of the tape (you’ll see why later). Then I shift the tape measure around so the right edge is lined up with the right edge of my 1/4″ foot and any markings on the machine. Then I use a pen to trace along that edge on the painter’s tape.
That drawn line gives me extra guidance along with my 1/4″ foot to assure that I am achieving an accurate seam. After doing this, test your seams by sewing pieces of scrap fabric together and then measuring the seam to make sure it’s 1/4″. Bonus: you can use it to guide your diagonal seams when you need to sew point to point on a square, like you do with flying geese units! No line drawing needed (last photo).


Item #2 – Recipe Book Holder. My kitchen counter was crowded and I hardly use cookbooks anymore, so I needed a place for this:


It works perfectly holding a pattern upright and secure so I can follow along with it while quilting. Of course it will work great with a quilting book too. The little “arms” hold the pages open.


Item #3 – Mason/Large Canning jar: You can use a large mason/canning jar to hold a large spool of thread if your machine does not have a spindle for the large spools. Use the cover that comes with the canning jar to help keep the spool from jumping out of the jar while you’re stitching.


If your jar cover does not have a hole in it like mine, carefully punch a hole to feed the thread through. Be sure to smooth down any sharp edges with a metal file so those edges do not cut your thread. If you do not have a cover, you can fashion one from a piece of cardboard.


The cardboard “top” can be taped on two sides to hold it down while you’re stitching.
Item #4 – Do you have some of those rectangular decorative magnets lying around? You know, the ones you buy at all your vacation stops? Well, if you have one that you don’t care to display anymore, you can use it as a pin collector next to your sewing machine.
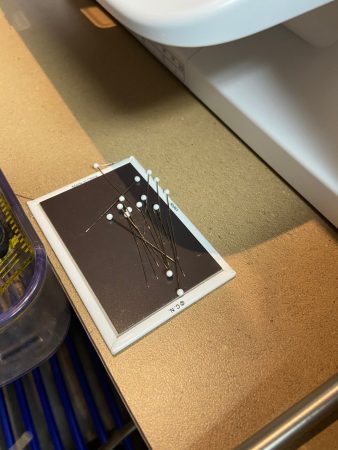
I used two-sided tape to affix it to my sewing table, magnet side up.
Finally, some random things I’ve used in my sewing room. I like to use my wood pressing stick to press seams open as I sew small units. If you do not have one of those, a good substitute is a cuticle stick.


No stylus to control your pieces while stitching? Use an orange peeler!


Next up… losing your scissors all the time? I know I lose mine under the clutter when I’m sewing. My solution? I found one of these ball chains in the jewelry making section of the craft store to make a scissors lanyard.


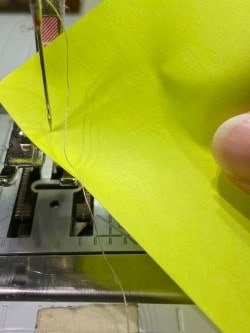
Last, but not least, if your sewing machine does not have an automatic threader, use a piece of colored paper to make the needle eye more visible while threading. I used a small post-it in the photos below. Notice how in the first photo, you can not see the needle’s eye clearly:

Now by holding the piece of paper behind the needle, the eye is more visible for easier threading!

That’s it for my crazy ideas! Share some of your quirky ideas in the comments below and be entered into a drawing for my pattern, Prairie Star.

The drawing will be on Monday, July 1st. Good luck! **We have a winner! Congrats, Pat Ricci!**
Happy Quilting,
Deanne


I use painters’ tape the same way – with lines for 1/4″ AND a line for the ‘0’ marking as well. I finally was able to give up drawing lines for my flying geese and HSTs and discovered I don’t have to pin absolutely everything anymore. It definitely speeded up my piecing. I have a lot of mason jars & wish I’d known this trick before I bought a stand for my thread cones. I don’t have any other tricks to share, but maybe someone else will. I enjoy your blog!
I discover the Ball jar trick when I needed to use a large spool and didn’t have a cone. I saw others online suggesting using one so I grabbed one of mine and used it. I was lucky mine already had a cover with a hole in it, but I knew they all didn’t so I came up with the cardboard cutout.
OMG! I love all of these… especially the painters tape! Why didn’t I think of this!?! Perfect solution! All of these tips are wonderful.. thanks so much for sharing with us!
You’re welcome!
I have a piece of batting next to me while sewing to catch cut off threads. Helps me be a bit neater!!
I like that. It works to pick them off the floor easily as well.
A Mr. Clean magic eraser does an excellent job removing chalk marks.
That’s an excellent idea. I’ll have to try that.